What Happened to the Sulfur Coin? (Sulfur science and can the coin melt again?)

What Happened to the Sulfur Coin? (Sulfur science and can the coin melt again?)

The coin:

Now, what happened to that coin? It was 10 days since I made it, and I wanted to show you what happened. Here’s the coin:20170815_174126

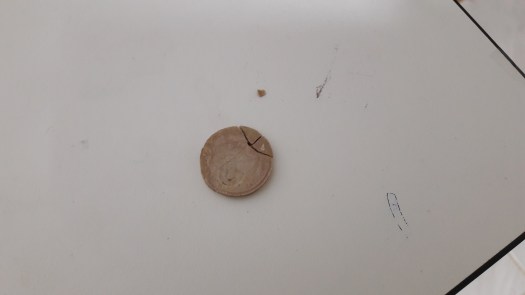
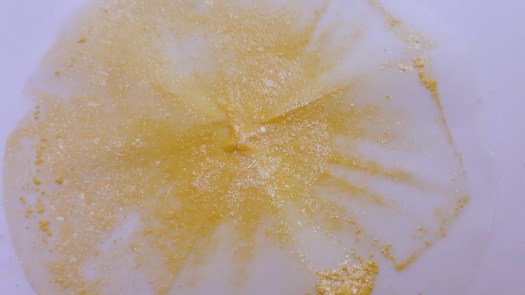
The coin has turned white and it came apart into a couple pieces… I guess it’s useless now, but I was wondering, can I melt it again? Let’s try it.

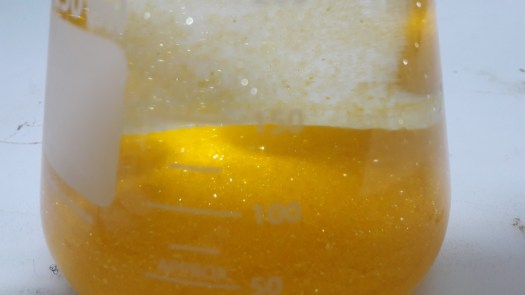
Can we melt it again:

Yes! Look at this:

20170815_174213

It’s melting just fine. It started melting in ten seconds (very quick). I’m guessing you could melt it as many times as you want just like the other metals.

Sulfur Science:

Why does yellow sulfur turn black when heated?

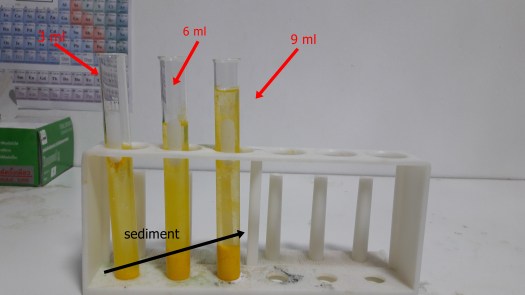
The internal structure of sulfur changes under heating. From stable at room temperature crystalline form of yellow color it turns into its plastic form, which has no specific internal structure. This changes the color of the substance: initially yellow sulfur becomes red-brown, and then black.

sulfur_melting

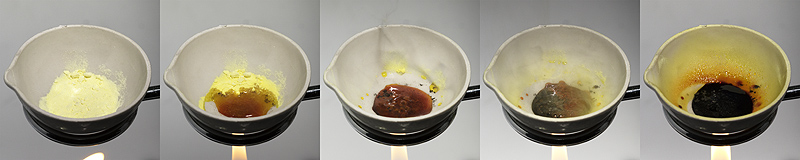
When heated above 119oC sulfur crystals melt and form a reddish-orange liquid, also consisting of S8 molecules. At temperatures even higher the sulfur ring molecules break, forming “strings” of atoms linked with one another. Exactly the occurrence of linear molecules makes molten sulfur black. These “strings” can bond their free ends to each other, forming very long molecules. As a result, the liquid sulfur thickens due to the “clumsiness” of large molecules. They can be compared to threads: the greater their length, the easier they get tangled with each other. If the black viscous liquid is heated to 187oC, it will become maximally dense (plastic sulfur). At temperatures higher yet still, the bonds in long molecules are destroyed once again, and the mass becomes thinner. Maximally runny black sulfur becomes at 400oC, and boils at 445oC.

Why does the coin change its color over time?

A substance always aims to take its most stable form. Black plastic sulfur is not stable under normal conditions. Therefore, it gradually changes its internal structure, crystallizes and turns into yellow rhombic sulfur.

The black figurine is made of very long molecules of sulfur Sn. Such an internal structure of the substance is stable only at high temperature. It can be temporarily stabilized only by quick cooling. At room temperature, long molecules gradually “break”, and their fragments form ring molecules S8. The latter form crystals of rhombic sulfur, which is the only allotropic modification of sulfur, stable at room temperature. In addition to color change, changes in other physical properties also occur. The figurine becomes fragile and eventually shatters. This process cannot be prevented, but it is very interesting to watch.

The coin turned yellow and crumbled in a couple days

Well, nothing is actually wrong here. Sulfur crystallization is a complicated process. The time it takes is mostly determined by the temperatures the substance was subjected to initially.

Source:

https://melscience.com/en/experiments/sulfur-melt/


Golden Rain

 Golden Rain

The silver tree was beautiful, now let’s perform a golden experiment.  This experiment kind of failed and pass. What I mean is that the experiment failed, and it was a success, you know what I mean. So don’t trust my steps, but be sure to follow the video at the end of this post.

This experiment is hard. Even I fail. So you shouldn’t handle this unless you’re an experienced chemist.

Things you’ll need: potassium iodide, lead (II) ni-  (wait, why am I posting this even it’s a fail? Ok then, I’ll show you what I did).

20170702_104841.jpg

This is when I took the flask from the alcohol burner. Yup, it looks like a disaster. This doesn’t even look like the video! Well to the next photo.20170702_114426

Yay! it worked! You could see the shiny particles coming down to the bottom. Success and fail. It looked really nice, I like this experiment.20170702_114538

Yes, Gold, Au everywhere!20170702_115440

This is when I filtered it out. Looks like golden paint.20170702_115434

A closer look.20170702_115622

This is the water that is filtered out. It still has some golden particles in it.

Well, after all of these photos I would say that it’s a success. Follow the video to do it:


Golden rain demonstration is made by combining two colorless solutions, potassium iodide solution and Lead(II) nitrate solution at room temperature to form yellow precipitate. During the chemical reaction, golden particles gently drop from the top of erlenmeyer flask to bottom, similar to watching the rain through a window. The golden rain chemical reaction demonstrates the formation of a solid precipitate. The golden rain experiment involves two soluble ionic compounds, potassium iodide (KI) and lead(II) nitrate (Pb(NO3)2), as formular : Pb(NO3)2 + 2KI → 2KNO3 + PbI2. They are initially dissolved in separate water solutions, which are each colorless. When mixed, a the lead from one solution and the iodide from the other combine to form lead(II) iodide (PbI2), which is insoluble at low temperature and has a golden bright yellow color. At higher temperature, this substance easily re-dissolves by dissociation to its colorless ions. To explain, a double displacement reaction occur when potassium iodide and lead(II) nitrate mixing together causing metals changing their position in both two compounds forming lead (II) iodide and potassium nitrate. Lead iodide is strong insoluble in water at room temperature causing yellow precipitate of lead iodide.

Source: https://en.wikipedia.org/wiki/Golden_rain_demonstration

The Sediment of Lead (II) Nitrate

The Sediment of Lead (II) Nitrate

Today, I’m going to do a common experiment about the sediment of Lead (II) Nitrate. This is a very quick demonstration showing that two solids can react together. White lead nitrate and white potassium iodide react to make yellow lead iodide.

I added 5 grams of each chemical into 95ml  of water so I could have 5 % of each.

I pour 10ml of potassium iodide solution into each test tube. And poured 3ml of lead (II) nitrate into the first test tube. Poured 6ml of lead (II)nitrate into the second test tube. And poured 9ml of lead (II) nitrate into the third test tube.20170621_204221

As you could see on the picture the more lead (II) nitrate I add to the potassium iodide, more sediment increases in the test tube.

The demonstration might have more impact if the test tubes are opaque and the yellow product can be poured out and shown to the unsuspecting audience. Have a white background available.

Point out that for a reaction to occur, particles of the reactants must meet. This is much easier in solution (where the particles are free to move) than in the solid state.

The reaction is:

Pb(NO3)2(s) + 2KI(s) →  2KNO3(s) + PbI2(s)

All of these compounds are white except lead iodide, which is yellow.

Lead ethanoate can be substituted for lead nitrate, but the reaction is much slower.

The experiment  Diffusion in liquids is a class practical using the same compounds but as solutions.

We must first convert from a word equation to a symbol equation:

Lead (II) Nitrate + Potassium Iodide Lead (II) Iodide + Potassium Nitrate

The lead (II) ion is represented as Pb2+, whilst the nitrate ion is NO3. To balance the charges, we require two nitrate ions per lead (II) ion, and so lead (II) nitrate is Pb(NO3)2 .

The potassium ion is K+ and the iodide ion is I. The two charges balance in a 1:1ratio, so potassium iodide is simply KI.

In lead (II) iodide, the charges balance in a 1:2 ratio, so the formula is PbI2.

Finally, in potassium nitrate, the charges balance in another 1:1 ratio, giving a formula of KNO3 .

The symbol equation is as follows:

Pb(NO3)2+KIPbI2+KNO3

The most obvious change we must make, when balancing this equation, is to increase the number of nitrate ions on the right hand side of the equation. We can do this by placing a coefficient of 2 before the potassium nitrate:

Pb(NO3)2+KIPbI2+2KNO3

In doing this we have upset the balance of potassium ions on each side of the equation. Again, we can fix this: we must simply place another coefficient of 2, this time before the potassium iodide:

Pb(NO3)2+2KIPbI2+2KNO3

Checking over the equations once more, you will notice that we initially had 1 iodide ion on the right hand side, but 2 on the left. However, we already dealt with this in balancing our potassium ions. Now, our equation is balanced.

And that’s it! One last thing to add is that you may have noticed the irregularity in iodide ions rather than nitrate ions. In this case, you would have arrived at the same answer simply by working backwards.

Source: https://socratic.org/questions/how-do-you-write-the-the-reaction-of-lead-ii-nitrate-aq-with-sodium-iodide-aq-to

Color Change Chemistry

Color Change Chemistry

Change a clear liquid pink, then back to clear again in this impressive experiment. It may seem like magic, but it’s actually the science of PH.

Things you’ll need: a beaker, a graduated cylinder, test tube holder, 3 test tubes, pipet, phenolphthalein, sodium carbonate, vinegar, and water.20170613_163519

  1. Fill the beaker halfway with water, and set the test tubes in the holder. I’ll refer to them in order as test tube 1, 2, and 3.20170613_163623
  2. Use a spoon to put a little bit of sodium carbonate in test tube 1.Use the pipet to add a few drops of water from the beaker. Swirl the test tube around to dissolve.20170613_164027
  3. In test tube 2, put two drops of phenolphthalein.20170613_164150
  4. Use the graduated cylinder to add 10 ml of vinegar to test tube 3.
  5. Carefully fill the first two test tubes with water from the beaker. Then, all at once, pour the contents of test tube 1 and 2  back into the beaker. The water will turn pink.20170613_164252
  6. Now pour the contents of test tube 3 into the beaker. the liquid will now be clear again. 

Phenolphthalein is a PH indicator that changes color when mixed with a base  (like sodium carbonate) but stays clear when mixed with an acid (like vinegar). In step 5, the phenolphthalein reacted to the basic sodium carbonate and turned the solution pink. To change it back to clear, you added acidic vinegar, neutralizing the basic sodium carbonate.

Learn more about phenolphthalein at this post: Invisible ink

Swirling Colors

Swirling Colors

Can you make colors move in milk? Then perform this experiment.

20170514_155028

Things you’ll need: whole milk, a shallow dish, food coloring, and liquid dish soap.

1. Pour whole milk into the shallow dish.20170514_155040
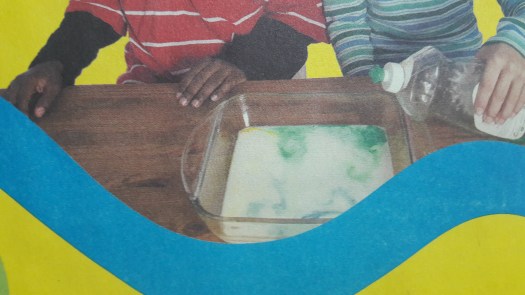
2. Let the milk warm up to room temperature.

3. Place drops of different food coloring in the milk. DO NOT STIR.

20170514_160304

4. Place 1-3 drops of liquid dish soap in the middle of the dish. Enjoy the show!


The colors move as the soap spreads across the surface of the milk. Once soap covers the surface, the swirling will stop instantly (if you use water).

In whole milk, fat is the secret ingredient that keeps the colors move. As the soap spreads out, it sticks to tiny globules of fat. As the globules take up soap, they make more room for soap to spread out.